Cracked tiles can detract from the aesthetic appeal of any kitchen or bathroom. This thorough guide offers a step-by-step approach to replacing damaged tiles, ensuring a beautiful and functional space. Cracked tiles are often a common problem in residential settings, especially in high-traffic areas like kitchens and bathrooms. This guide will delve into the common causes of tile damage and offer solutions, ranging from minor repairs to complete replacements. We will offer you with information on determineing the problem, choosing suitable replacements, and performing the necessary repairs yourself. The article is divided into sections, each focusing on a particular facet of the replacement process, from initial assessment to finishing touches.
determineing the Problem: Assessing Cracked Tiles
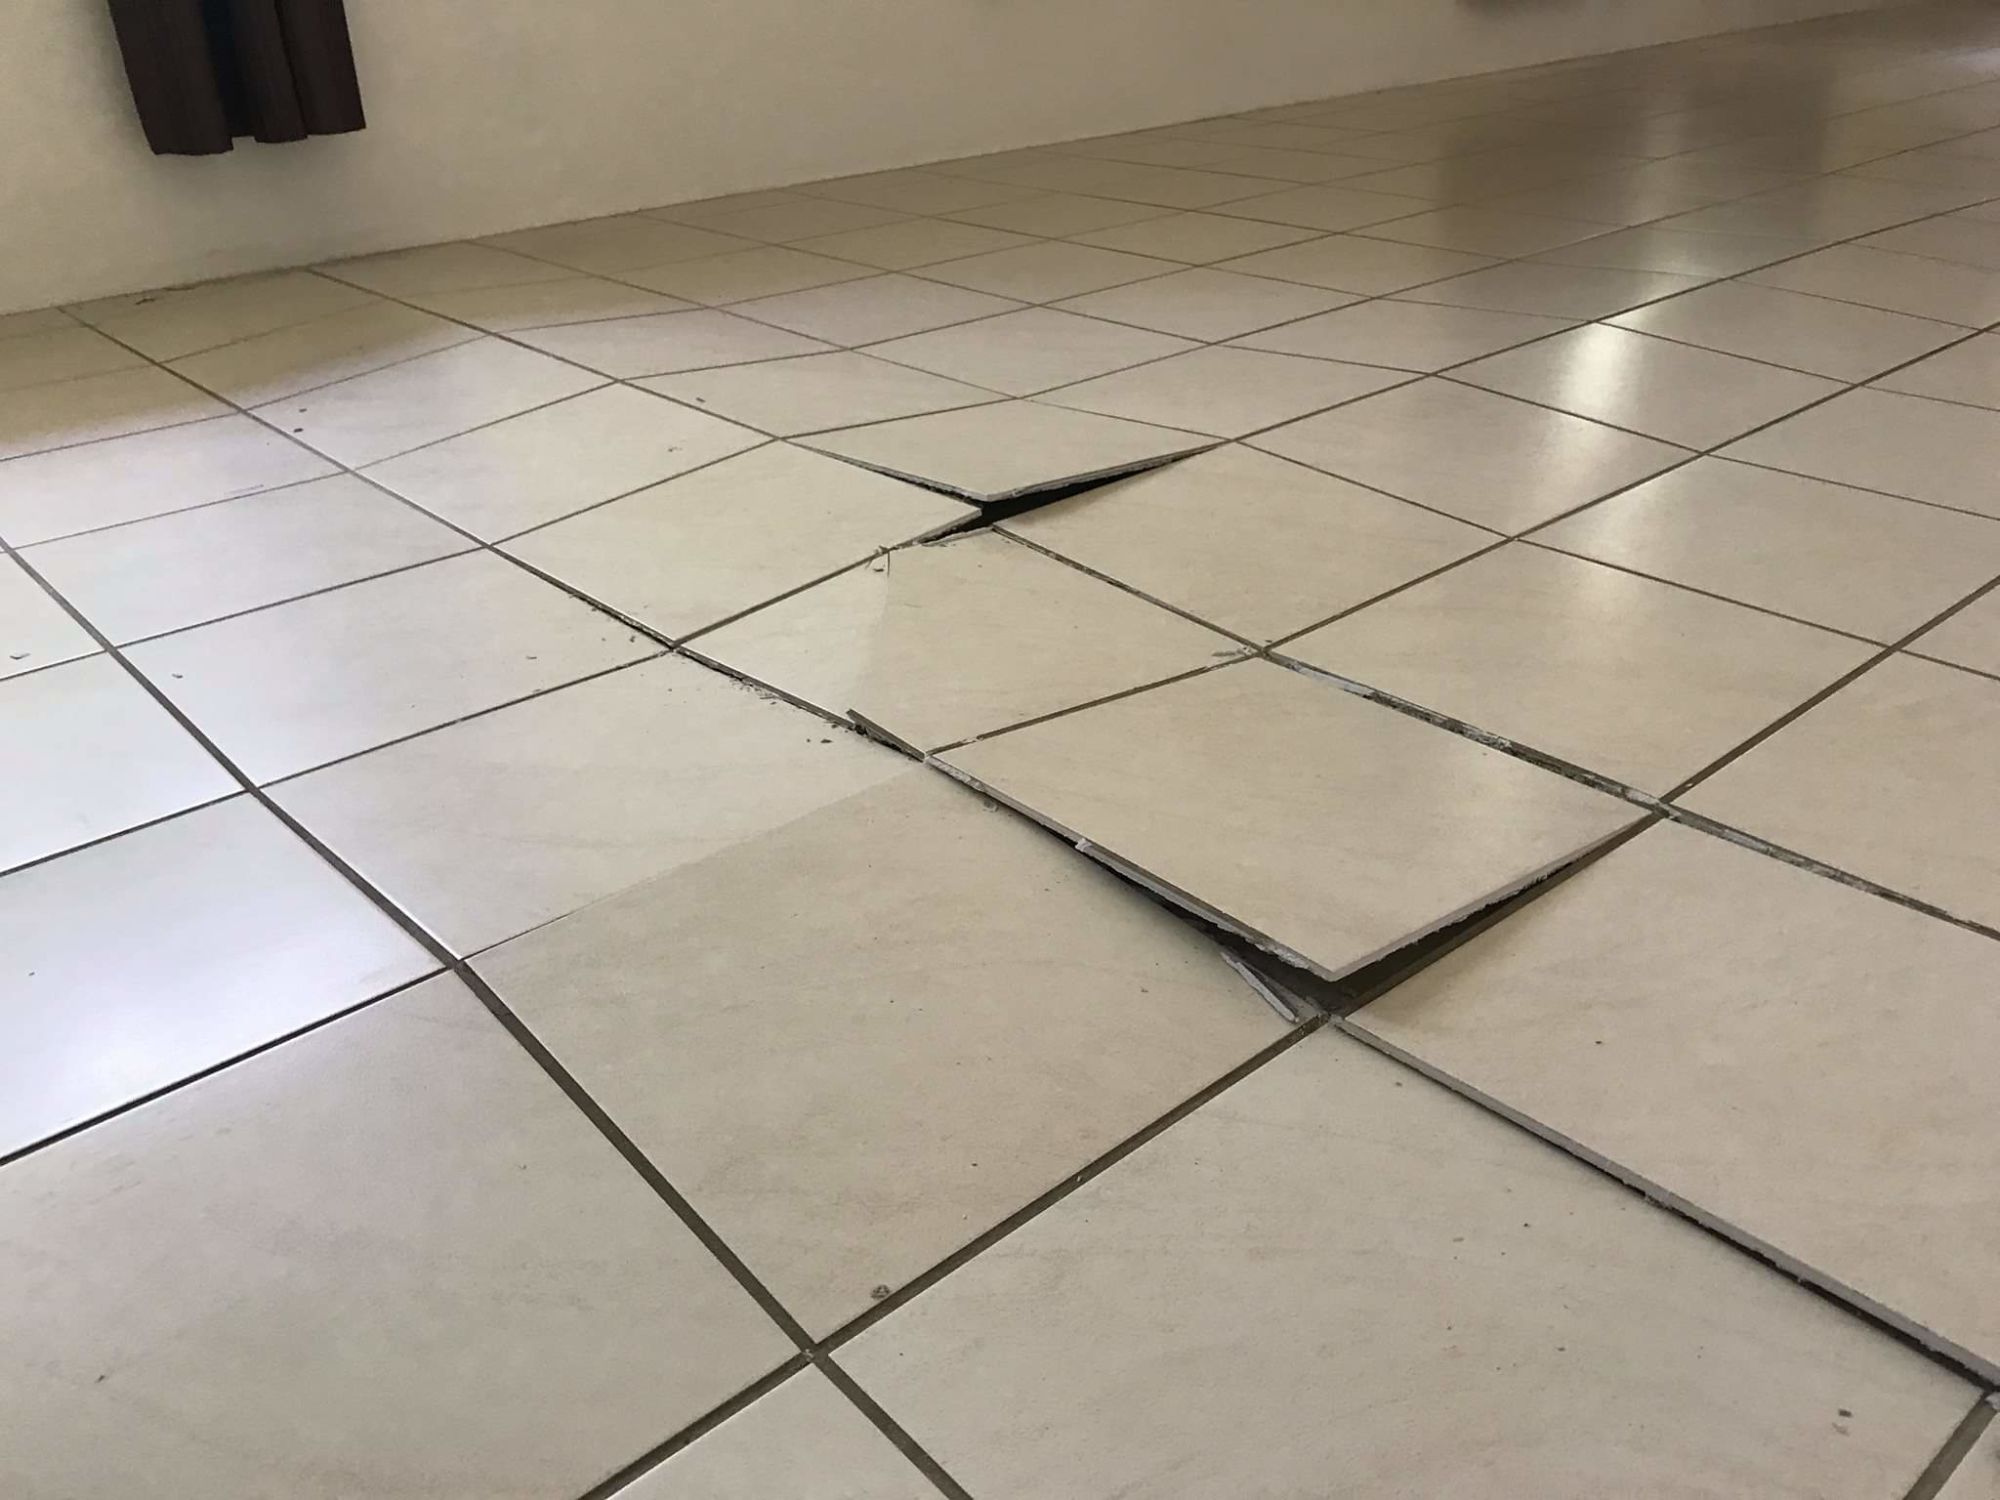
Understanding the Severity of the Damage
determineing the extent of the damage to your cracked tiles is crucial to selecting the right repair or replacement method. A small crack in a less visible area might be repairable, while a large fissure or multiple cracks across a tile may require complete replacement. Assess the damage, considering factors such as the size, depth, and location of the cracks. A small crack near the grout lines may only require grout repair while large cracks in the tile itself might demand replacement. Consider potential structural issues too, a large crack could be a sign of foundation problems or other structural instability in the floor.
Choosing the Right Repair Method
Once you have identified the problem, you need to select the optimal method to fix it. Several factors will influence your decision, such as the type of tile, the cause of the damage, and the availability of replacement tiles. For minor cracks, you could select to fill the cracks with a suitable patching material or to replace a single tile. For larger repairs, you might need to consider replacing a section of tiles. Analyze the damage and its impact on the surrounding area; a simple repair method can lead to a major aesthetic problem if not done carefully and professionally.
varied Repair Options
Grout repair is a good option for minor cracks around the grout. This involves cleaning the cracked area thoroughly, mixing grout with water according to the manufacturer’s instructions, and carefully filling the cracks. It is crucial to use the correct color of grout. For cracks in the tile itself, replacing the cracked tile is the most reliable option. Carefully consider the layout and pattern of your tiles. This could impact the ease of replacement and whether you might need to replace other tiles nearby, which could lead to a need for further preparation.
selecting Suitable Replacement Tiles
Matching the Existing Tiles
Replacing cracked tiles requires careful selection of replacement tiles to match the existing ones in terms of color, size, shape, and material. Using a similar or identical tile will prevent a visible difference in your flooring. Using an identical tile will minimize the difference in the visual appeal of your flooring, ensuring a flawless outcome. A professional tile installer will be able to advise on the optimal choice.
Considering the Tile Material
The material of your tiles will also determine the type of replacement tile. Common materials include ceramic, porcelain, and stone. Choosing the correct material is vital for the long-term durability and aesthetic of your flooring. If the cracked tile is in a high-traffic area, choosing a material like porcelain or stone might offer better resistance to damage.
Evaluating Tile Styles and Patterns
Keeping the style and pattern of the tiles consistent is vital for maintaining the aesthetic appeal of your flooring. If the pattern is complex, hiring a professional tile installer might be a good idea.
Sourcing Replacement Tiles
You can source replacement tiles from your local home improvement stores, hardware stores, or online retailers. Inquire about availability and potentially get samples to match the existing tiles exactly. Finding the right tiles is an essential step to avoid significant aesthetic issues in the finished work.
Preparing the Area for Replacement
Removing the Cracked Tile
Carefully remove the cracked tile, taking precautions to avoid further damage to surrounding tiles or the surface beneath. Proper removal techniques will prevent unwanted damage.
Cleaning the Surface
Thoroughly clean the surface where the cracked tile was located to remove any debris, dust, or old adhesive residue. This will ensure a strong bond for the new tile, creating a professional-quality installation.
Preparing the Adhesive
Preparing the adhesive correctly is essential to achieve a secure and stable installation. Ensure the adhesive is mixed according to the manufacturer’s instructions. Ensure that the adhesive is the right type for your project and adhere to the instructions carefully.
Planning the Replacement
Once the area is clean, consider the layout to ensure a seamless transition when completing the repair and avoiding any issues in the future. This careful planning will guarantee a consistent visual outcome. Using a pencil or marker to mark the new tile placement location can help.
Installing the New Tile
Applying the Adhesive
Apply a thin layer of adhesive to the prepared surface according to the manufacturer’s instructions, ensuring it is spread evenly. Be aware that using the wrong type of adhesive can cause the tiles to become loose in the future and will need to be replaced again.
Positioning the Tile
Carefully position the new tile in the prepared area, ensuring it is aligned and level with the existing tiles. Consider using a level to ensure the tile is installed correctly. A proper technique is vital to prevent visual issues and ensure structural stability.
Securing the Tile
Secure the new tile firmly in place, using the appropriate tools and techniques recommended by the manufacturer. This ensures a stable and lasting installation. Taking your time will guarantee a consistent appearance.
Grouting and Finishing
Once the tile is secured, apply grout to the gaps between the tiles. Follow the manufacturer’s instructions on grouting techniques. The optimal time to grout is after the adhesive has completely dried. Cleaning up excess grout and ensuring that all the grout is evenly distributed and the same color is crucial for a seamless and professional finish.
Related Post : do interior designers charge
Troubleshooting Common Issues
Uneven Tiles
Uneven tiles can affect the overall aesthetic. Use a level and adjust accordingly. Checking the tiles and ensuring that all are properly aligned is key for consistency.
Grout Problems
Grout problems can affect the aesthetics. Consider grout repairs in the area. Ensure that the grout is the right color to prevent unwanted visual issues. Careful attention to detail will guarantee a professional-quality outcome.
Tile Adhesive Issues
Tile adhesive problems are easily avoidable. Carefully read the manufacturer’s instructions and ensure the proper type of adhesive is used. Using the right product is crucial to avoiding issues during and after the installation.
Q: How can I determine if a cracked tile is repairable or needs replacement?
A: Determining if a cracked tile is repairable involves assessing the extent of the damage. Small cracks within the grout lines or minor chips may be repairable through grout repair. However, larger cracks extending through the tile or affecting the structural integrity of the tile will likely require complete tile replacement. Cracks may also point to problems with the sub-floor, such as moisture or settling issues, which may need to be addressed before installation.
Q: What types of tools and materials are necessary for replacing cracked tiles?
A: You will need a tile saw, grout, tile adhesive, a level, a grout float, and cleaning materials. Ensure that you have the right type of adhesive for the specific tile material, and always consult the manufacturer’s instructions. Depending on the size of the repair, you may also need other tools, like a hammer, chisel, or a utility knife.
Q: What are the optimal practices for preventing future tile cracking?
A: Preventative measures include ensuring proper support for heavy objects and appliances, addressing moisture issues promptly, and choosing tiles that are suited for the specific application or area. Using high-quality materials and ensuring proper installation from the outset will significantly minimize future problems.
In conclusion, replacing cracked tiles is a manageable DIY project for homeowners with some basic skills. Proper preparation, careful selection of replacement tiles, and attention to detail are key to achieving a flawless outcome. If you’re still unsure about any facet, consulting a professional is always a good idea. Ready to tackle your cracked tiles? Visit our website for a thorough guide and learn how to transform your kitchen or bathroom with ease!